Skip to product information
1 of 4

BEESIDY

16W Sound Activated Fiber Optic Light Engine, Bluetooth App/RF Remote Control for Starlight Headliner, Car Plug & Power Adapter, PG Connector & 3 Drill Bits

16W Sound Activated Fiber Optic Light Engine, Bluetooth App/RF Remote Control for Starlight Headliner, Car Plug & Power Adapter, PG Connector & 3 Drill Bits

Regular price $45.00 USD
Regular price Sale price $45.00 USD
Sale Sold out
Shipping calculated at checkout.
Size

Parameter:

Work Voltage: AC86-265V/DC12V
Power: 16W
LED Chip: RGBW LED
Remote: RF/Bluetooth
Light Body Material: Aluminum
Light Engine Device Size: 4.13 in L × 3.74 in W × 2.36 in H
Light Engine Device: 2-Year Service

About this item

9-IN-1 LIGHT ENGINE PACKAGE

This package includes ×1 light engine device, ×1 RF remote, ×1 car plug, ×1 power adapter, ×1 PG connector, ×1 manual, ×3 drill bits

CAR / HOME USE

16w light engine come with car plug and powder adapter, Perfect for car / home use

MUSIC MODE

Light engine has sound activated mode, The light dances to the music, Create a vivid and romantic starry sky

APP / RF REMOTE CONTROL

The light engine can be controlled by APP or remote, Both of them have many functions and many color changes, Remote has no battery

SERVICE

If you have any problem with the product, please be free to contact us at any time

Package Included:

1x16W Light Engine, 1x RF Remote Controller(NOT included CR2025 3V Button Battery of Remote)
1x Car Use Plug, 1x Power Adapter, 1x PG Connector
3 x Drill Bits (diameter: 0.8mm(0.031in), 1mm(0.04in), 1.5mm(0.06in)), 1x User Manual
NOTE: If you are use in the car, please choose car use plug. The power adapter is for indoor use.

View full details

In the lead up to Christmas, we decorate our front yards and decorate our homes. Of course, our car cannot be left alone! Want your car to stand out on Christmas Eve? Transform your car into a mesmerizing masterpiece with Beesidy Starlight Headliner.

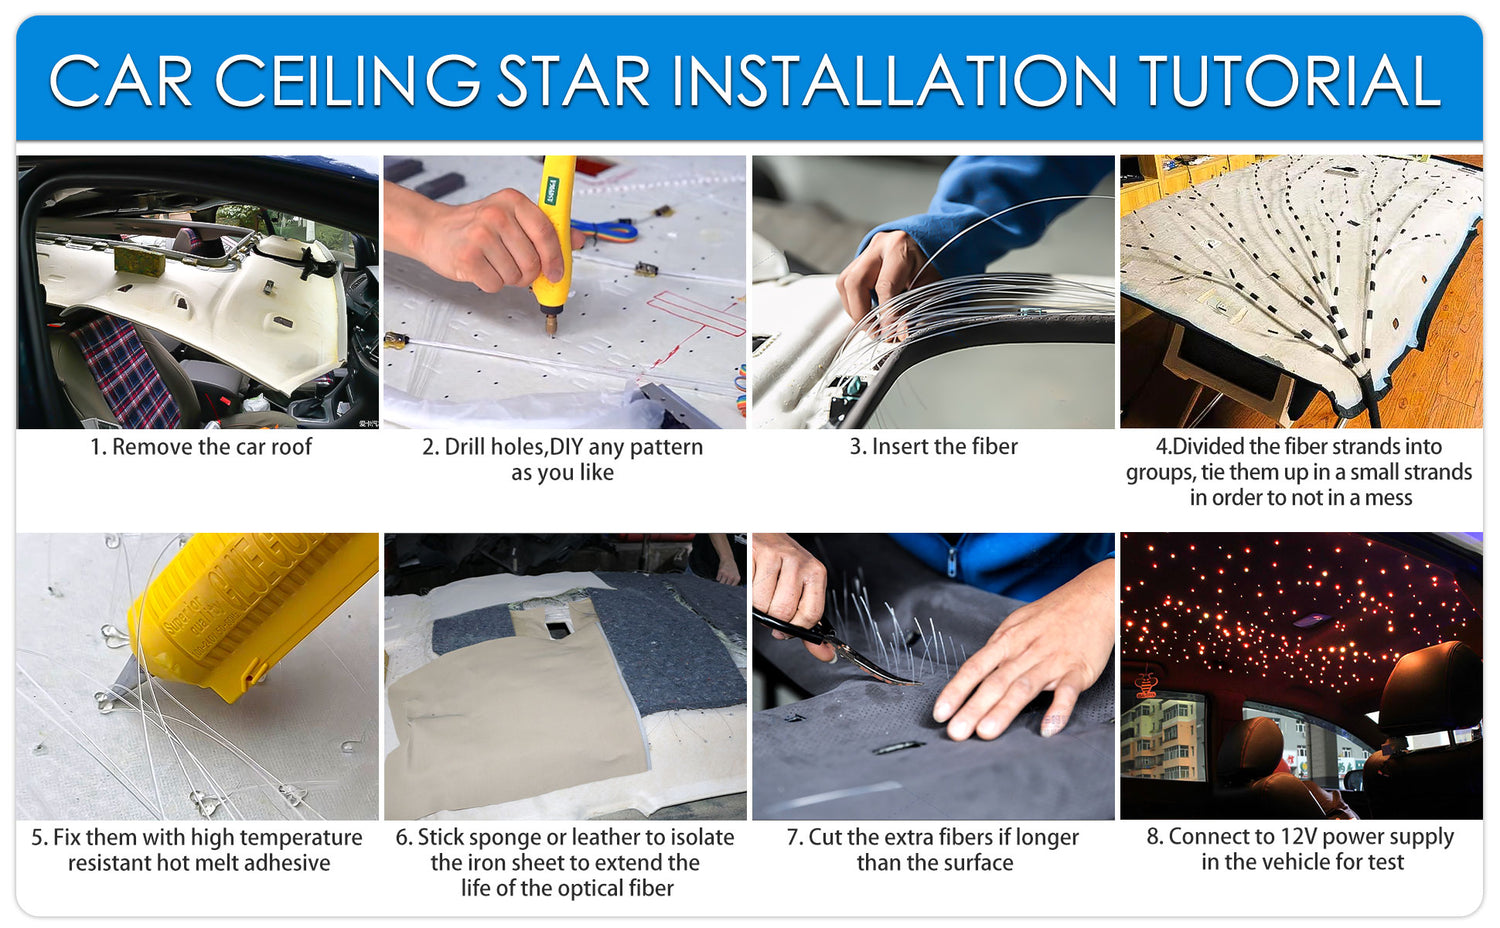
INSTALLATION TUTORIAL

1.Remove the car roof

Remove the roof of the car first(Overturn Copilot or seat,remove it from the back door)

2.Drill holes

 you can use the pen to draw  the point ,then use a 0.5mm-1.5mm twist drill bit to drill holes.

lf you want to make complex patterns, such as stars,  galaxies, etc., you can paste a pattern on the back of the ceiling then Punch holes according to the pattern  . Simple patterns can be directly Just draw holes in the ceiling.

3.Insert fiber

4.Fixed fiber

Use hot melt glue or kafuter K-5905 glue to fix.

5.Straighten the fiber

Straighten the optical fiber lines(ens of small bundles), and the concentrated parts can be rolled with black electric tape so tha tthey will not be scattered.

6.Stick sponge or leather

Stick sponge or leather to isolate the iron sheet to extend the life of the optical fiber.

7.Cut the fiber

Cut off the excess fibers in thecar, usually cut it flat to the roof.You can also cut the fiber after installing the roof.

8.Electrical connection

The power supply can be connected to the cigarette lighter plug,low beam, driving light, ACC, and the required power supply voltage is 12V. The LED light source can be hidden in the C-pillar or the trunk. Finally, Put the car roof back on .